DBaaS の比較 Part1 Cloud SQL 編
無料の Supabase の上限に達することもあるだろうと考えて、Cloud SQL の料金についてまず調べてみた。
料金 | Cloud SQL: Relational Database Service | Google Cloud
専用コア インスタンスと共有コア インスタンスがあるようである。
Enterprise エディションの場合、専用コア インスタンスの最小 vCPU の単位は最小1 コアだと思われる。 South Carolina (us-east1) で $30.149 per vCPU 、$5.11 per GB である。
共有コア インスタンスの場合、一番安いのは db-f1-micro であり、0.6 RAM (GB) ストレージは 最大 3,062 GB までで月間で$7.665となっている。これなら月額1000円だし、払えなくもない金額であると思われる。
オペレーション ガイドライン | Cloud SQL for PostgreSQL | Google Cloud
上のURL によると、下記のようであり、SLA を求めるなら HA 専用コア インスタンスまで契約しないといけないが高額なので検討は厳しいだろう。
少なくとも 1 つの専用 CPU によって高可用性を実現するように構成された Cloud SQL インスタンスのみが Cloud SQL の SLA の対象となります。共有コア インスタンスとシングルゾーン インスタンスは、SLA の対象外です。
試算は下記の URL からできる。730時間使いっぱなしだと最小の共有コア インスタンスでも15ドルくらいはかかるようである。
インスタンスの停止とかもできるようだが、サーバーレスというよりは、利用しない夜間の時間帯だけ自動停止するバッチを組むような使い方しかできなさそうである。起動までもどのくらい時間を要するだろうか。他の AWS とか Azure でもサーバーレス機能は Postgres に関してはないようである。
フロントエンドのサンプルアプリ作成
Next.js + Vercel + Auth.js + Supabase + Prisma + TypeScript を使った小規模アプリケーションを作成したいと思います。
nvm のインストール
$ curl -o- https://raw.githubusercontent.com/nvm-sh/nvm/v0.40.1/install.sh | bash
$ nvm install 18
$ npx create-next-app@latest npx-sample-app \
>  --typescript \
> --eslint \
> --src-dir \
> --import-alias "@/*"
npx create の際に、Tailwind CSS と App Router は一応入れておいた。
$ cd npx-sample-app
$ npm install next-auth prisma @prisma/client @supabase/supabase-js
...
found 0 vulnerabilities
Supabase でプロジェクトを作成
npx-sample-app-dev を作成した。 後ほど、npx-sample-app-prod も作成して、本番環境はこちらを利用する想定。
Postgres client psql のインストール
$ brew install libpq
$ echo 'export PATH="/usr/local/opt/libpq/bin:$PATH"' >> ~/.bash_profile
$ source ~/.bash_profile
$ psql --version
psql (PostgreSQL) 17.2
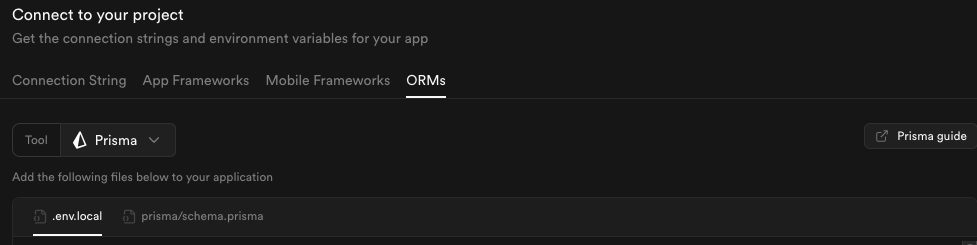
下記の画面から Prisma の接続情報がそのまま書いてあったので流用した。実行完了
$ npx prisma migrate dev --name init
一旦諸々を作成した。コードを編集した後は、下記のコマンドで確かめる。
$ npm run build
Vercel の ビルドがうまくいくかを先にローカルで確かめる。
Vercel CLI のインストール:
$ npm i -g vercel
$ vercel login
$ vercel build
OSS の一般的なコントリビュートの方法
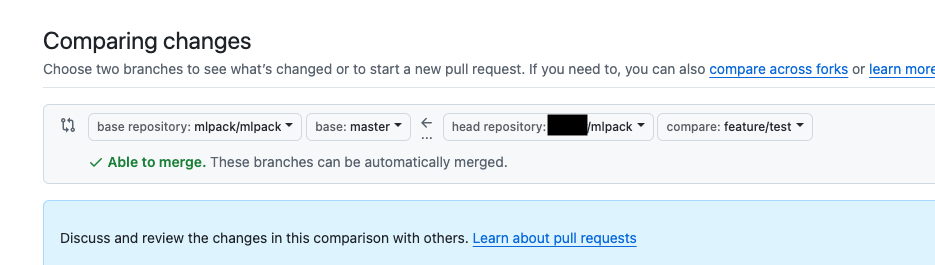
folk に関してあまり知見がなかったので、軽くまとめてみる。例は mlpack という OSS である。
まず、ブラウザで https://github.com/mlpack/mlpack にアクセスし、右上の「Fork」ボタンをクリックしてフォークを作成します。
フォークしたリポジトリをローカルにクローンします:
git clone https://github.com/$GITHUB_USERNAME/mlpack
- 上流リポジトリの設定
下記のコマンドにより、通常の個人開発とかと違って後ほどプルリクエストを上流リポジトリのブランチにリクエストすることができます。
git remote add upstream https://github.com/mlpack/mlpack
- ブランチを最新化する
cd mlpack
git branch # master にいるかどうかを確認
git fetch upstream # 上流リポジトリの最新の内容をローカルに取得する
git merge upstream/master # 現在のブランチに上流リポジトリの master を merge する
補足: git merge コマンドは、現在のブランチに他のブランチの変更を統合するためのコマンドであり git merge <マージ元ブランチ名> と実行する。マージ先のブランチは現在のブランチであるので指定する必要はない。
- 開発作業およびプルリクエストを出すまでの用意
git switch -c feature/feature-name
# ファイルの編集
git add .
git commit -m "commit message"
git push origin feature/feature-name
git push に関しては、VS Code の GUI 上だと リモートを upstream か origin かを選択するようになっているが、一般的な開発フローでは、origin に対してプッシュを行い、upstream から変更を取り込む(フェッチやプル)操作を行うのであり、いきなり upstream を push 先に設定することはありません。
また、git pull が内部的に git fetch と git merge を組み合わせたものであるとよく解説されるが、git push は単一のコマンドであり、特定のコマンドの組み合わせとして分解されることはないです。
ブランチ戦略について語っている人がいて、実務としてのGitは簡単で、原則は「共有レポ(github)にあるブランチやコミットを壊さない」。つまり
- githubにあるブランチfooを手元のfooに反映する場合はpull —rebase
- 自分が管理するブランチはpull —rebase以外はrebaseもsquashもしない。他のブランチを適用する場合は必ずno-ff merge
リモートリポジトリの main や develop などの重要なリポジトリをローカルに反映させたい場合は、git pull の時に rebase オプションを付けることでローカルのコミットがリモートの最新コミットの上に再適用され、履歴が直線的でシンプルになります。これにより、不要なマージコミットが生成されず、履歴が見やすくなります。
git switch branch-name
# 下の2つのコマンドは git pull --rebase upstream branch-name でまとめられる
git fetch upstream branch-name
git rebase upstream/branch-name
逆に、自分が編集しているブランチに他のブランチを反映させたい時は、--no-ff を付けると良さそうである。
git checkout feature/feature-name
git merge --no-ff upstream/branch-name
Next.js による静的サイトの公開
nvm のインストールおよびプロジェクトの作成
$ curl -o- https://raw.githubusercontent.com/nvm-sh/nvm/v0.40.1/install.sh | bash
$ nvm install 18
$ npx create-next-app@latest my-next-static-app --typescript
✔ Would you like to use ESLint? … Yes
✔ Would you like to use Tailwind CSS? … Yes
✔ Would you like your code inside a `src/` directory? … Yes
✔ Would you like to use App Router? (recommended) … Yes
✔ Would you like to use Turbopack for `next dev`? … No
✔ Would you like to customize the import alias (`@/*` by default)? … No
Creating a new Next.js app in /Users/keisukegoto/dev/my-next-static-app.
git branch をすると main ブランチが作られていることが確認できる。git のセットアップも同時にやっている
ローカルの開発環境で現在の動きを確認したい場合は、下記のコマンドを実行する
$ npm run dev
ファイルの編集
src/app/globals.css
- 全体のページの CSS の定義をする
@tailwind base;
@tailwind components;
@tailwind utilities;

:root {
  --background: #ffffff;
  --foreground: #171717;
}

@media (prefers-color-scheme: dark) {
  :root {
    --background: #ededed;
    --foreground: #0a0a0a;
  }
}

body {
  color: var(--foreground);
  background: var(--background);
  font-family: Arial, Helvetica, sans-serif;
}
src/app/layout.tsx
- global.css で全体設定を読み込んでいる。
- ヘッダーや、フッターを読み込み、サイト全体のテンプレートをどう表示するかを設定
import { Inter } from 'next/font/google'
import './globals.css'
import Header from './components/Header'
import Footer from './components/Footer'
const inter = Inter({ subsets: ['latin'] })
export const metadata = {
  title: 'Static Next.js Site',
  description: 'A static site built with Next.js',
}
export default function RootLayout({
  children,
}: {
  children: React.ReactNode
}) {
  return (
    <html lang="en">
      <body className={inter.className}>
        <Header />
        <main className="min-h-screen">
          {children}
        </main>
        <Footer />
      </body>
    </html>
  );
}
下記については、output オプションとかの編集をした。
next.config.ts
- Next.jsの設定ファイル
- 静的エクスポートの設定
- 画像最適化の設定
import type { NextConfig } from "next";

const nextConfig: NextConfig = {
  output: 'export',
  images: {
    unoptimized: true
  }
};

export default nextConfig;
src/app/about/page.tsx
- app 配下に about とか作ると、ルーティング含めてそれぞれのページが自動的に作成される。
- About(会社/製品紹介)ページのコンテンツ
export default function Home() {
    return (
      <div className="container mx-auto px-4 py-12">
        <h1 className="text-4xl font-bold mb-8">Welcome to our Static Site</h1>
        <p className="text-lg mb-4">
          This is a static site built with Next.js and deployed to S3.
        </p>
      </div>
    );
}
src/app/components/Footer.tsx
- フッターコンポーネント
- コピーライトや補足情報を表示
- 全部のページに反映される
export default function Footer() {
    return (
      <footer className="w-full py-8 bg-gray-100">
        <div className="container mx-auto px-4 text-center">
          <p>© 2025 Your Static Site. All rights reserved.</p>
        </div>
      </footer>
    );
  }
src/app/components/Header.tsx
- ヘッダーコンポーネント
- ナビゲーションメニューを表示
- 全部のページに反映される
import Link from 'next/link'
export default function Header() {
  return (
    <header className="w-full py-6 bg-white shadow-sm">
      <nav className="container mx-auto px-4">
        <ul className="flex space-x-6">
          <li><Link href="/" className="hover:text-blue-600">Home</Link></li>
          <li><Link href="/about" className="hover:text-blue-600">About</Link></li>
          <li><Link href="/features" className="hover:text-blue-600">Features</Link></li>
          <li><Link href="/pricing" className="hover:text-blue-600">Pricing</Link></li>
        </ul>
      </nav>
    </header>
  );
}
src/app/features/page.tsx
- 機能紹介ページのコンテンツ
- 機能の内容が雑すぎるのでもう少しそれっぽいワードを入れても良かったかも。
export default function Features() {
    const features = [
      {
        title: "Feature 1",
        description: "Detailed explanation of feature 1 and its benefits",
        details: [
          "Benefit point 1",
          "Benefit point 2",
          "Benefit point 3"
        ]
      },
      {
        title: "Feature 2",
        description: "Detailed explanation of feature 2 and its benefits",
        details: [
          "Benefit point 1",
          "Benefit point 2",
          "Benefit point 3"
        ]
      }
    ];

    return (
      <div className="container mx-auto px-4 py-16">
        <h1 className="text-4xl font-bold mb-12 text-center">Our Features</h1>
        <div className="space-y-16">
          {features.map((feature, index) => (
            <section
              key={feature.title}
              className={`flex flex-col md:flex-row items-center gap-8 ${
                index % 2 === 1 ? 'md:flex-row-reverse' : ''
              }`}
            >
              <div className="flex-1">
                <h2 className="text-3xl font-bold mb-4">{feature.title}</h2>
                <p className="text-xl mb-6 text-gray-600">{feature.description}</p>
                <ul className="space-y-3">
                  {feature.details.map((detail) => (
                    <li key={detail} className="flex items-center">
                      <svg className="w-6 h-6 mr-2 text-green-500" fill="none" stroke="currentColor" viewBox="0 0 24 24">
                        <path strokeLinecap="round" strokeLinejoin="round" strokeWidth="2" d="M5 13l4 4L19 7" />
                      </svg>
                      {detail}
                    </li>
                  ))}
                </ul>
              </div>
              <div className="flex-1">
                <div className="bg-gray-200 rounded-lg h-64 flex items-center justify-center">
                  <span className="text-gray-500">Feature Image</span>
                </div>
              </div>
            </section>
          ))}
        </div>
      </div>
    );
}
src/app/pricing/page.tsx
- 価格プランページのコンテンツ
- こちらももう少し機能の説明をそれっぽくしたくはあるけど、見た目はそれっぽくなっている。
export default function Pricing() {
    const plans = [
      {
        name: "Starter",
        price: "$9",
        features: [
          "Basic feature 1",
          "Basic feature 2",
          "Basic feature 3"
        ]
      },
      {
        name: "Professional",
        price: "$29",
        features: [
          "Pro feature 1",
          "Pro feature 2",
          "Pro feature 3",
          "Pro feature 4"
        ]
      },
      {
        name: "Enterprise",
        price: "Custom",
        features: [
          "Enterprise feature 1",
          "Enterprise feature 2",
          "Enterprise feature 3",
          "Enterprise feature 4",
          "Enterprise feature 5"
        ]
      }
    ];

    return (
      <div className="container mx-auto px-4 py-16">
        <h1 className="text-4xl font-bold mb-12 text-center">Pricing Plans</h1>
        <div className="grid md:grid-cols-3 gap-8">
          {plans.map((plan) => (
            <div key={plan.name} className="border rounded-lg p-8">
              <h2 className="text-2xl font-bold mb-4">{plan.name}</h2>
              <p className="text-4xl font-bold mb-6">{plan.price}</p>
              <ul className="space-y-3 mb-8">
                {plan.features.map((feature) => (
                  <li key={feature} className="flex items-center">
                    <svg className="w-5 h-5 mr-2 text-green-500" fill="none" stroke="currentColor" viewBox="0 0 24 24">
                      <path strokeLinecap="round" strokeLinejoin="round" strokeWidth="2" d="M5 13l4 4L19 7" />
                    </svg>
                    {feature}
                  </li>
                ))}
              </ul>
              <button className="w-full bg-blue-600 text-white py-2 rounded-lg hover:bg-blue-700">
                Get Started
              </button>
            </div>
          ))}
        </div>
      </div>
    );
}
tailwind.config.ts
- Tailwind CSSの設定ファイル
- スタイルの適用範囲やテーマの設定
- 全部のページに反映される
import type { Config } from 'tailwindcss'

const config: Config = {
  content: [
    './src/app/**/*.{js,ts,jsx,tsx,mdx}',  // srcディレクトリを含むように修正
  ],
  theme: {
    extend: {
      backgroundImage: {
        'gradient-radial': 'radial-gradient(var(--tw-gradient-stops))',
        'gradient-conic':
          'conic-gradient(from 180deg at 50% 50%, var(--tw-gradient-stops))',
      },
    },
  },
  plugins: [],
}
export default config
src/app/page.tsx
- トップページ(ランディングページ)のコンテンツを定義
- 製品紹介とフィーチャーカードを表示
- div タグの中に /icons/simple.webp などとあるが、public/icons/flexible.webp を読み込みにいくという設定である。
import Image from 'next/image'
export default function Home() {
  return (
    <div className="container mx-auto px-4">
      {/* Hero Section */}
      <section className="py-20">
        <div className="text-center">
          <h1 className="text-5xl font-bold mb-6">Welcome to Production</h1>
          <p className="text-xl mb-8 text-gray-600">
            Discover how our solution can transform your workflow
          </p>
          <a href="/features"
             className="bg-blue-600 text-white px-8 py-3 rounded-lg hover:bg-blue-700">
            Explore Features
          </a>
        </div>
      </section>
      {/* Features Overview */}
      <section className="py-16">
        <div className="grid md:grid-cols-3 gap-8">
          {[
            {
              title: "Simple",
              description: "Easy to understand and implement",
              icon: "/icons/simple.webp"
            },
            {
              title: "Flexible",
              description: "Adaptable to your needs",
              icon: "/icons/flexible.webp"
            },
            {
              title: "Powerful",
              description: "Robust features for any scale",
              icon: "/icons/powerful.webp"
            }
          ].map((feature) => (
            <div key={feature.title} className="text-center p-6">
              <div className="inline-block mb-4">
                <Image
                  src={feature.icon}
                  alt={feature.title}
                  width={300}
                  height={300}
                />
              </div>
              <h3 className="text-xl font-bold mb-2">{feature.title}</h3>
              <p className="text-gray-600">{feature.description}</p>
            </div>
          ))}
        </div>
      </section>
    </div>
  );
}
Azure Static Web Apps へのデプロイ
- リソースグループ my-next-static-app を作成
各種情報を入力し、デプロイ
静的 Web アプリの名前: my-next-static-app
- プランの種類: Free
- デプロイのソース: GitHub
- GitHub アカウントを自分のアカウントでログインする
- 組織、リポジトリ を該当のリポジトリで設定
- 分岐: main
デプロイ認可ポリシ: GitHub
作成されたリソースに、azurestaticapps.net のドメインの新しい URL が作成されるため、アクセスすると画面が表示される。
"ワークフローの表示" に表示されている URL を見に行くと .github/workflows 配下に下記のような yaml ファイルが自動で生成されて commit されていることが確認できる。ローカルに pull しておく。
name: Azure Static Web Apps CI/CD

on:
  push:
    branches:
      - main
  pull_request:
    types: [opened, synchronize, reopened, closed]
    branches:
      - main

jobs:
  build_and_deploy_job:
    if: github.event_name == 'push' || (github.event_name == 'pull_request' && github.event.action != 'closed')
    runs-on: ubuntu-latest
    name: Build and Deploy Job
    permissions:
       id-token: write
       contents: read
    steps:
      - uses: actions/checkout@v3
        with:
          submodules: true
          lfs: false
      - name: Install OIDC Client from Core Package
        run: npm install @actions/core@1.6.0 @actions/http-client
      - name: Get Id Token
        uses: actions/github-script@v6
        id: idtoken
        with:
           script: |
               const coredemo = require('@actions/core')
               return await coredemo.getIDToken()
           result-encoding: string
      - name: Build And Deploy
        id: builddeploy
        uses: Azure/static-web-apps-deploy@v1
        with:
          azure_static_web_apps_api_token: ${{ secrets.AZURE_STATIC_WEB_APPS_API_TOKEN_WITTY_GRASS_0F13B7A0F }}
          action: "upload"
          ###### Repository/Build Configurations - These values can be configured to match your app requirements. ######
          # For more information regarding Static Web App workflow configurations, please visit: https://aka.ms/swaworkflowconfig
          app_location: "/" # App source code path
          api_location: "" # Api source code path - optional
          output_location: "out" # Built app content directory - optional
          github_id_token: ${{ steps.idtoken.outputs.result }}
          ###### End of Repository/Build Configurations ######

  close_pull_request_job:
    if: github.event_name == 'pull_request' && github.event.action == 'closed'
    runs-on: ubuntu-latest
    name: Close Pull Request Job
    steps:
      - name: Close Pull Request
        id: closepullrequest
        uses: Azure/static-web-apps-deploy@v1
        with:
          action: "close"
LFCS 対策 (対策中)
- man でコマンドのオプションは調べることができる。調べたいワードがあれば grep してみると分かりやすい。
- apropos <キーワード> で何か該当するコマンドがないか調べることができる。
- DNSのファイルは /etc/hosts にある。
Schedule tasks
3種類のジョブがある - cron: 電源がオフになっている時はジョブは見逃される。cat /etc/crontab で記述方法を確認することができる。crontab -e でジョブを編集 - anacron: 電源がオフになっている時に実行できなかったジョブは、電源がオンになった時にジョブがすぐに実行される。/etc/anacrontab でジョブを編集 - at: 1度だけ実行すべきタスクを実行する。at <実行タイミング> と記述し、その後実行すべきコマンドを入力する。atq でリストを確認できる。コマンドを忘れても apropos at で調べられるはず。
Networking
- ip a show dev
(example: eth0) (ip addr に置き換えてもオッケー) - sudo ss -tunlp (u: udp, n: 数字の表示設定 t:tcp l: listening の表示 p: プロセス情報の表示)
- sudo netstat -tulpn | grep LISTEN (netstat や ss はほぼ同じ使い方ができると考えてオッケー)
- sudo ip route (show)
packet filterling
ufw というファイアーウォールのツールがある。man ufw を見ると大体使い方が分かるが、基本的なコマンドは下記
ファイルを探す
find -name "xxxx" だと、再帰的に探すことができる。-name を付けないと、ディレクトリ配下のファイルを探すことができない。
CKA の mock exam 2
CKA の Udemy course の mock exam を試してみたので、ポイントを解説する。
設問1: /opt/etcd-backup.db に etcd のクラスターをバックアップする
/ect/kubernetes/manifests/etcd.yaml に各種設定が入っていることに気付ければオッケー。
後は検索したら、ドキュメントから下記のようなコマンドを探せるはず。endpoint もここに入っている。
ETCDCTL_API=3 etcdctl --endpoints $ENDPOINT snapshot save snapshot.db
設問2: emptyDir タイプのボリュームタイプを持つ Pod を作成する
Pod のテンプレートを作成する。dry-run=client で yaml ファイルに吐き出す。
そのあとは、ドキュメントで emptyDir を検索し、テンプレートをコピーアンドペーストすれば作成できる。
設問3: system_time を Pod に設定し、4800 秒 sleep させる
Pod のテンプレートを作成する。dry-run=client で yaml ファイルに吐き出す。
その後は、command の実行方法を検索するのと、security context で検索して、system_time を設定するテンプレートをコピーしてPod を作成する。
設問4: pvc と mountPath を設定した Volume を作成する
k get pvc で volume があることを察知できるかどうか。pvc は作成する必要がある。pvc を作成すると、volume が bound されることが確認できる。
pv と volume の名前は一致させなくても良い。pod 内の volume の記述の中で pvc と対応させることができるが、ドキュメント上のテンプレートからある程度取ってこれる。
設問5: ローリングアップグレード
cheet sheet からkubectl set image コマンドを確認することができる。
設問6-8
まだできていないので、確認でき次第、更新する。
その他
- --watch オプションでコンテナ作成までの様子を見ることができる。
